

📗Introduction
🔸 Objective: Develop an application that prints "Hello World" on the console upon clicking a button shown on the stage.
🔸 Steps to Achieve the Goal:
Design the user interface (UI) with a button and a console display.
Write code to handle the button click events.
Implement the logic to print "Hello World" on the console.
Connect the UI elements with the corresponding code.
Launch the application and test the functionality.
Celebrate your success! 🎉
🔸 Key Components:
JavaFX: A powerful framework for creating graphical user interfaces in Java.
Stage: The main window that hosts the application.
Button: An interactive element that triggers an action upon clicking.
Console: A text-based interface for displaying output.
🚀 Step 1: Extend and Override 🚀
✅In JavaFX, the start() method 🚀 serves as the entry point for constructing a JavaFX application. To utilize this method effectively, we need to follow these steps:
✅Override the start() method: To customize the behaviour of the start() method according to our application's requirements, we must extend the javafx.application.Application class and provide our own implementation of the start() method.
✅Import the javafx.stage.Stage class: The start() method expects an object of the javafx.stage.Stage class as a parameter. So, it's necessary to import this class into our code. The Stage class represents the main window or stage of the JavaFX application.
✅Pass the Stage object into the start() method: Once the Stage class is imported, we need to pass an instance of this class as a parameter to the start() method. This allows us to access and manipulate the stage during the application's initialization.
✅Import javafx.application.Application: To override the start() method, we need to import the javafx.application.Application class. This class provides the necessary framework for creating JavaFX applications and handling their lifecycle.
package application;
import javafx.application.Application;
import javafx.stage.Stage;
public class Hello_World extends Application{
    @Override
    public void start(Stage primaryStage) throws Exception {

    }
}
🔘 Step 2: Button Creation 🔘
To create a button in JavaFX, we can simply instantiate the javafx.scene.control.Button class. 🎛️ For this, we need to import the Button class into our code. 📥
Pass the desired label text for the button in the constructor of the Button class. 🖍️ The code will look something like this:
package application;
import javafx.application.Application;
import javafx.stage.Stage;
import javafx.scene.control.Button;

public class Hello_World extends Application{
    @Override
    public void start(Stage primaryStage) throws Exception {
          Button myButton = new Button("Click Me!");
    }
}
💡 Step 3: Layout and Button 💡
JavaFX provides several layouts to help visualize widgets properly. 📐✨ To achieve this, we need to implement one of these layouts as the root node of the scene graph. This root node will serve as the container for all other nodes, such as buttons and texts. 🌱
In this application, we have chosen to implement the StackPane layout. 📚📏 To do this, we can instantiate the javafx.scene.layout.StackPane class. The code will now look like this:
package application;
import javafx.application.Application;
import javafx.stage.Stage;
import javafx.scene.control.Button;
import javafx.scene.layout.StackPane;

public class Hello_World extends Application{
    @Override
    public void start(Stage primaryStage) throws Exception {
        Button myButton = new Button("Click Me!");
        StackPane root=new StackPane();
        root.getChildren().add(myButton);
    }
}
By using the StackPane layout, we can stack our nodes on top of each other, ensuring proper visualization of the widgets in our JavaFX application.
🎨 Step 4: Scene Creation 🎨
To bring our layout to life, we need to add it to a scene in JavaFX. 🖼️ The scene holds a higher position in the application structure hierarchy. We can create a scene by instantiating the javafx.scene.Scene class. 🌆
To do this, we simply need to pass our layout object to the constructor of the Scene class. 🔄 The code for our application will now look like this:
package application;
import javafx.application.Application;
import javafx.stage.Stage;
import javafx.scene.control.Button;
import javafx.scene.layout.StackPane;
import javafx.scene.Scene;

public class Hello_World extends Application{
    @Override
    public void start(Stage primaryStage) throws Exception {
        Button myButton = new Button("Click Me!");
        StackPane root = new StackPane();
        root.getChildren().add(myButton);
        Scene scene = new Scene(root);
    }
}
By creating a scene and associating it with our layout, we are setting the stage for our JavaFX application to display and interact with the UI components. 🎨🚀
🏰 Step 5: Stage Preparation 🏰
The javafx.stage.Stage class offers important methods that allow us to customize the attributes of the stage in our JavaFX application. 🏰✨ We can set the title of the stage to give it a meaningful name. Additionally, it's crucial to call the show() method to ensure that the stage is actually displayed. 🌟🎬
Let's take a look at the code snippet below, which demonstrates how we can prepare the stage for our application:
package application;
import javafx.application.Application;
import javafx.scene.control.Button;
import javafx.scene.layout.StackPane;
import javafx.scene.Scene;
import javafx.stage.Stage;
public class Hello_World extends Application{
@Override
public void start(Stage primaryStage) throws Exception {
Button myButton = new Button("Click Me!");
StackPane root = new StackPane();
root.getChildren().add(myButton);
Scene scene = new Scene(root);
primaryStage.setScene(scene);
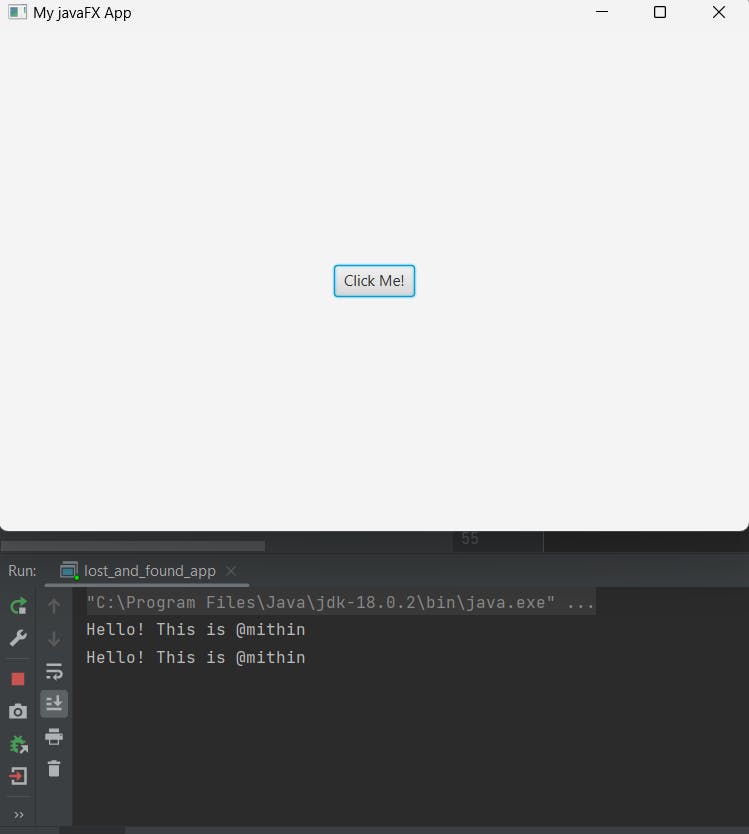
primaryStage.setTitle("My javaFX App");
primaryStage.show();
}
}
By creating an instance of the Stage class, setting the title, and invoking the show() method, we're ready to showcase our JavaFX application to the world! 🌍🚀
🔀 Step 6: Button Event Creation 🔀
To make our application interactive and responsive, we need to create an event for the button. 🎉 For this purpose, we can call setOnAction() on the button and define an anonymous class Event Handler as a parameter to the method. 👥🔘
Inside this anonymous class, we can define a method handle() that contains the code for how the event is handled. In our case, we want to print "Hello World" on the console. 🖨️🌍
Take a look at the code snippet below, which demonstrates how we can accomplish this:
package application;
import javafx.application.Application;
import javafx.scene.control.Button;
import javafx.scene.layout.StackPane;
import javafx.scene.Scene;
import javafx.stage.Stage;
import javafx.event.ActionEvent;
import javafx.event.EventHandler;

public class Hello_World extends Application{
    @Override
    public void start(Stage primaryStage) throws Exception {
        Button myButton = new Button("Click Me!");

        myButton .setOnAction(new EventHandler<ActionEvent>() {

            @Override
            public void handle(ActionEvent arg0) {
                System.out.println("Hello! This is @mithin");
            }
        });

        StackPane root = new StackPane();
        root.getChildren().add(myButton);
        Scene scene = new Scene(root, 600, 400);

        primaryStage.setScene(scene);
        primaryStage.setTitle("My javaFX App");
        primaryStage.show();
    }
}
By setting the onAction event handler for our button, we ensure that when it is clicked, the handle() method inside the anonymous class is executed, printing "Hello! This is @mithin" on the console. 🌟
🔍 Step 7: Main Method Creation 🔍
Till now, we have configured all the necessary things required to develop a basic JavaFX application. 🛠️📲 However, our application is still incomplete because we haven't created the main method yet. This method serves as the entry point for our application. 🔑
To finalize our application, we need to create the main method, where we will launch the application by calling the launch() method and passing the command line arguments (args) to it. 🚀 The code for this final step will look like the following:
package application;
import javafx.application.Application;
import javafx.scene.control.Button;
import javafx.scene.layout.StackPane;
import javafx.scene.Scene;
import javafx.stage.Stage;
import javafx.event.ActionEvent;
import javafx.event.EventHandler;

public class Hello_World extends Application{
    @Override
    public void start(Stage primaryStage) throws Exception {
        Button myButton = new Button("Click Me!");

        myButton .setOnAction(new EventHandler<ActionEvent>() {

            @Override
            public void handle(ActionEvent arg0) {
                System.out.println("Hello! This is @mithin");
            }
        });

        StackPane root = new StackPane();
        root.getChildren().add(myButton);
        Scene scene = new Scene(root, 600, 400);

        primaryStage.setScene(scene);
        primaryStage.setTitle("My javaFX App");
        primaryStage.show();
    }

    public static void main(String[] args) {
        launch(args);
    }
}
By creating the main method, we ensure that our JavaFX application is ready to be launched and run, bringing our UI and functionality to life! 💫🎉
The Application will produce the following output on the screen.
Thank You Soo Much for your valuable time.😊🥳👋
👋 Hi there! Let's connect and collaborate!
Here are some ways to reach me:
🔹 GitHub: github.com/mithindev
🔹 Twitter: twitter.com/MithinDev
🔹 LinkedIn: linkedin.com/in/mithindev/
Looking forward to connecting with you!
#JavaFX #JavaProgramming #UIDevelopment #JavaDevelopment #EventHandling #JavaFXLayouts #StageConfiguration #ButtonEvents #ApplicationDevelopment #JavaFXBeginnerGuide